Hope you are all enjoying your weekend!!
From now until midnight Monday Sept. 1 (or whenever I wake up on Tuesday), receive:
* Free Shipping on all ribbon sculptures or hair clips.
* $1 off of all tutorials/instructions
Please put LABORDAYBLOG in the "message to seller" and I will refund the discount. Or you may ask for a revised invoice and wait to pay!
Have a great Labor Day!!!
Click Here To Vist My Shop

Saturday, August 30, 2008
Thursday, August 28, 2008
First Day of Kindergarten!
I can't believe I just put my baby girl on a bus for her first day of Kindergarten! Feels like just yesterday she was a baby! Where does the time fly to??
I had made an apple hair clip for her first day. Then this morning she tells me she needed a pencil hair clip!!! So with just minutes to spare, I made one real quick for her LOL!
Doesn't that backpack look so big? LOL!!


I had made an apple hair clip for her first day. Then this morning she tells me she needed a pencil hair clip!!! So with just minutes to spare, I made one real quick for her LOL!
Doesn't that backpack look so big? LOL!!


Saturday, August 23, 2008
ATTENTION ALL RIBBON SCULPTURISTS!!!
I've been busy! I've made some more instructions! Come check them out! If it is sold out, check in my shop to see if it's relisted, PunkyNMunky.
Gymnast & Swimmer Tutorial

Evil Queen Tutorial

I'm working on a few more as well!
Gymnast & Swimmer Tutorial
Evil Queen Tutorial
I'm working on a few more as well!
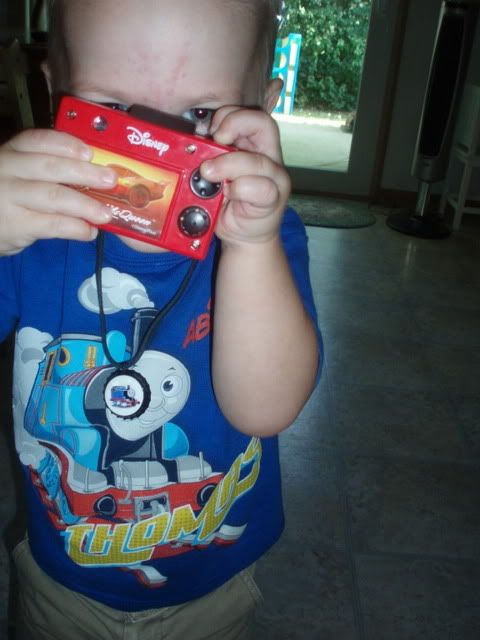
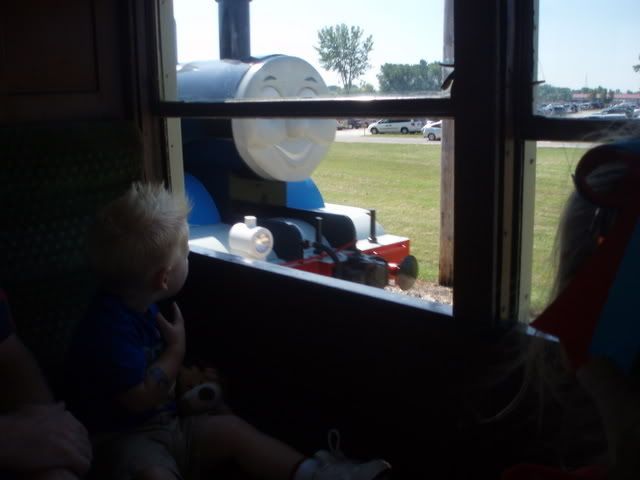
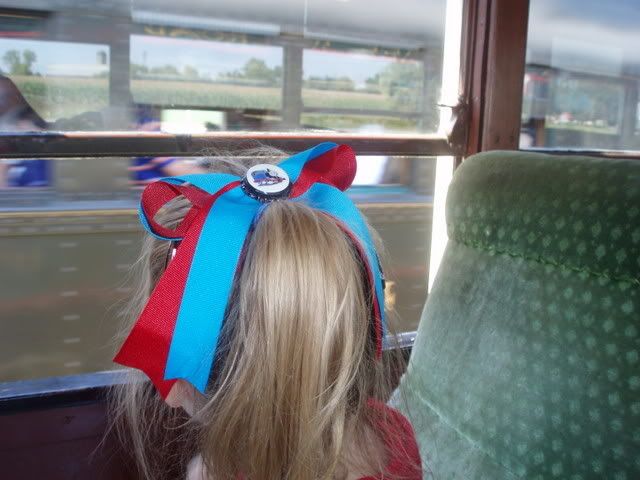
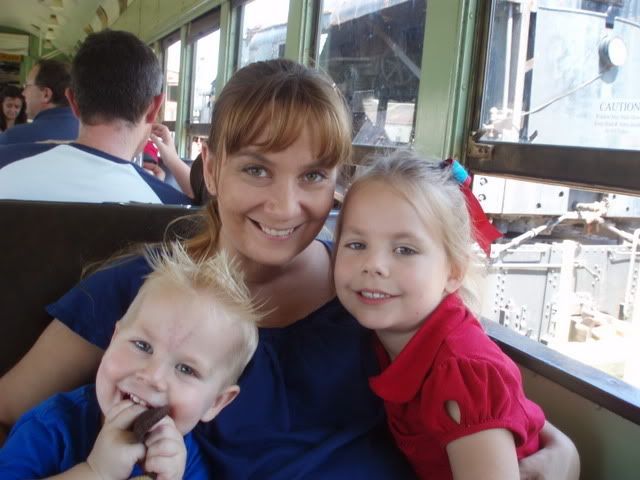
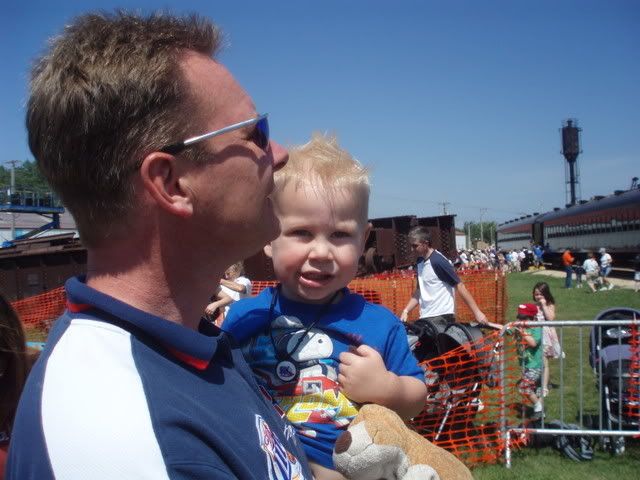
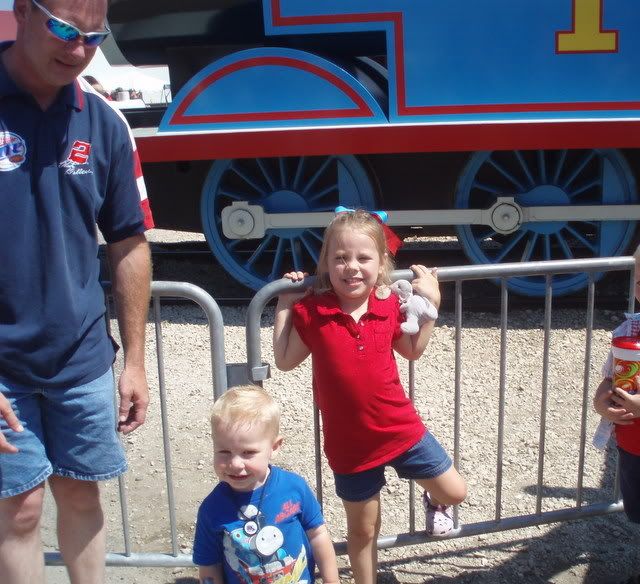
Day Out With Thomas!
Thomas the Tank Engine came to our area last weekend so I got tickets to take the kids. I had taken Punky when she was 2, so now that Munky is 2, I thought he should get a chance to go too! When I had taken Punky, I had sewn a dress just for the occasion. Wow, I can't believe how much she has grown since then!


This year, since my sewing machine is put away to make room at the dinner table for Munky, I wanted to make a hair bow for the outing! Being too lazy to come up with a ribbon sculpture, I enlisted the help of my online friend Shannon from GHButterflies, she makes some awesome images! I asked her to make some bottle caps for a bow center as well as a bottle cap necklace for Munky! She did a fantastic job!!! I once thought about making my own bottlecaps, but for now, I think if I need some I'll just order from her, it was too easy!
I had intended on making a pigtail set for Punky, but a few days before I made the bows she said she didn't want to wear pigtails, just one ponytail. So I made a bow to wear on her ponytail. I have one bottle cap left over, trying to decide what to do with it now!
Anyway, here are just a few pictures of our "Day Out With Thomas".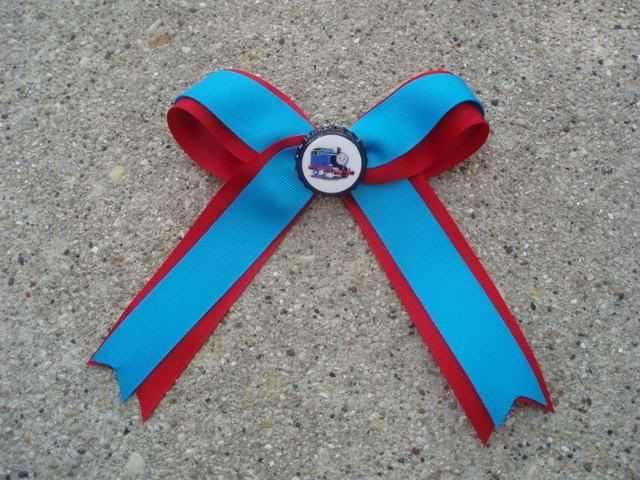
Monday, August 4, 2008
Curly hair for a day!
Hair set tutorial! Make your straight hair curly!
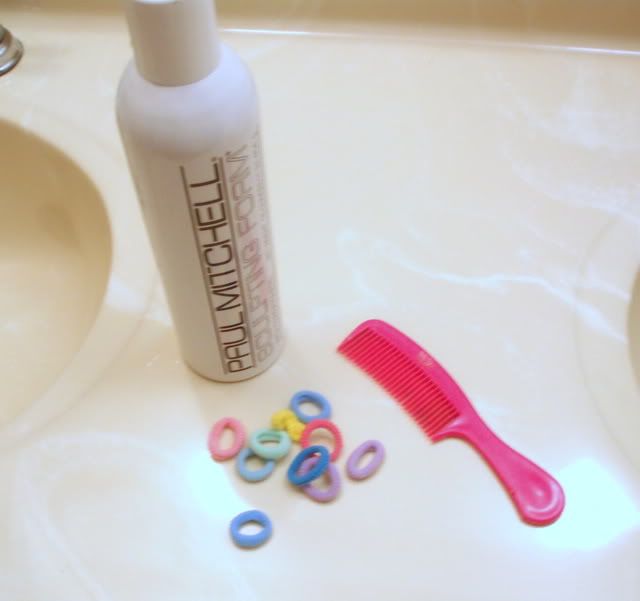
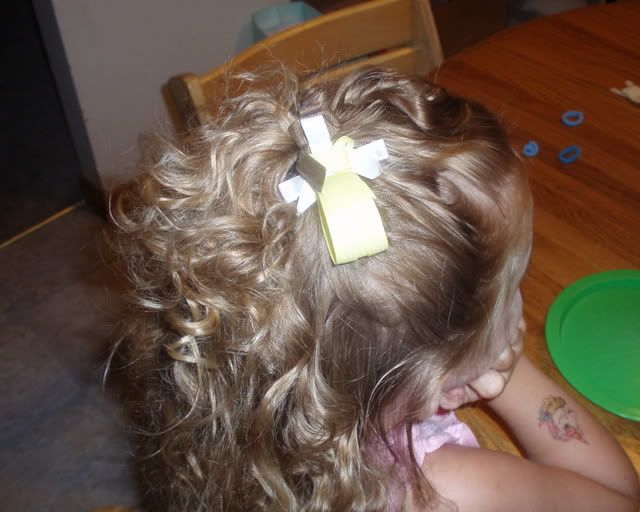
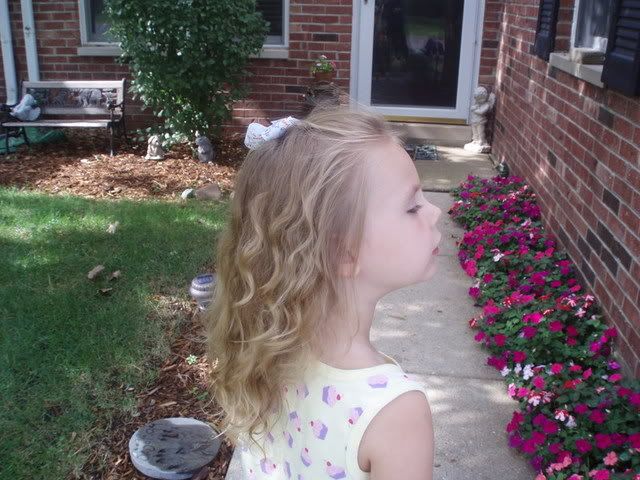
Not everyone is lucky enough to have beautiful wavy or curly hair. But those of us with straight hair have an option to have curly or wavy hair for a day! This set turns out really cute on little girls for a dressy occasion and looks best adorned with your favorite Punky N Munky hair accessory!
Collect your supplies:
Hair product that is appropriate for your hair type
A comb
A bunch of knit ponytail holders
Place the hair product on clean towel dried hair and comb through to evenly distribute. If the hair is very thick, let the hair dry to just slightly damp before continuing.
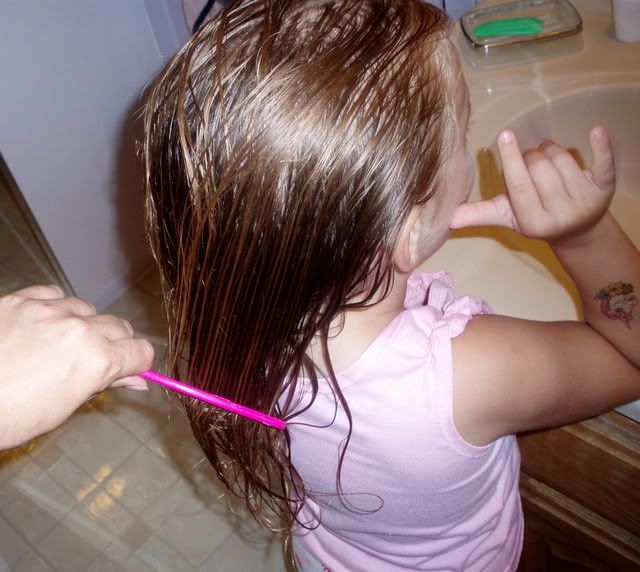
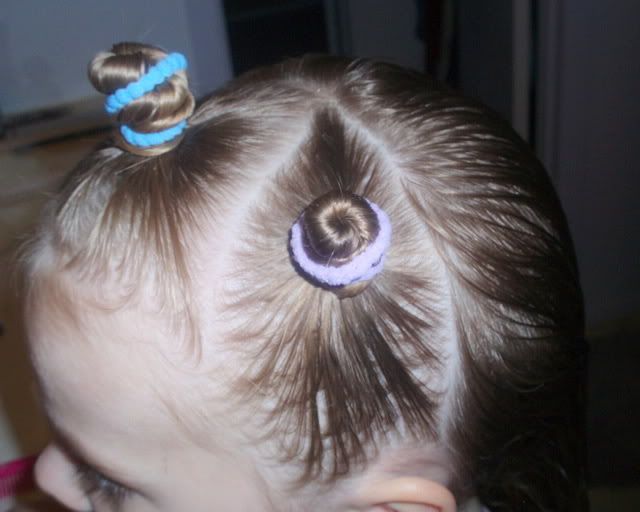
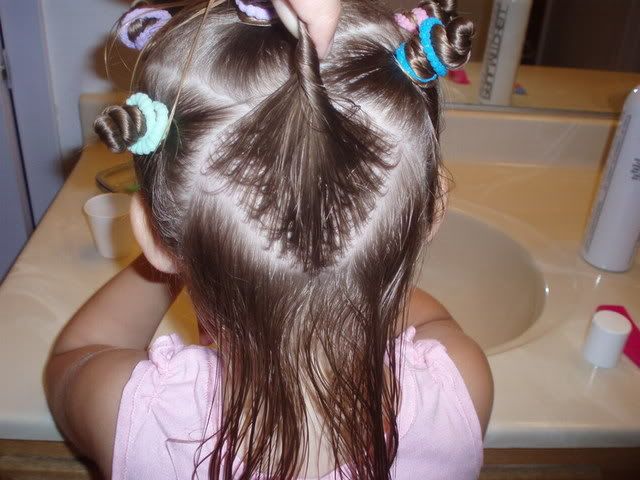
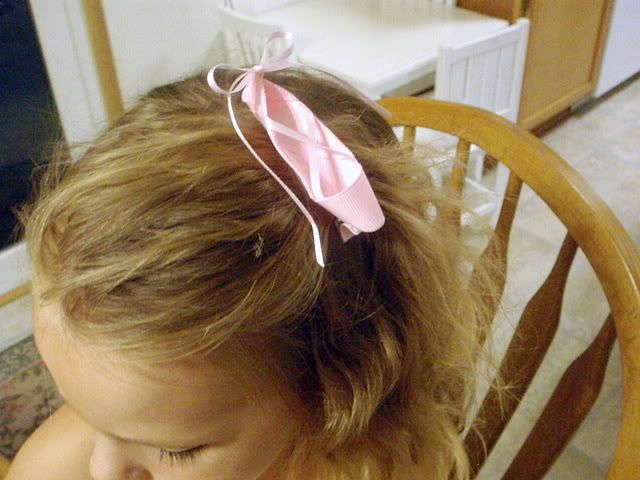
Next we’re going to make sections in the hair. Triangles, diamonds, squares, and rectangles all work well. The smaller the sections, the tighter the curl will be. You will want to experiment for what works best for the hair you are working with. I will show you what works on my model.
Using the tip of the comb, make a triangular section from the corner of the eyebrows to the center top. Allowing your model to make silly faces in the mirror can help lighten the mood :)
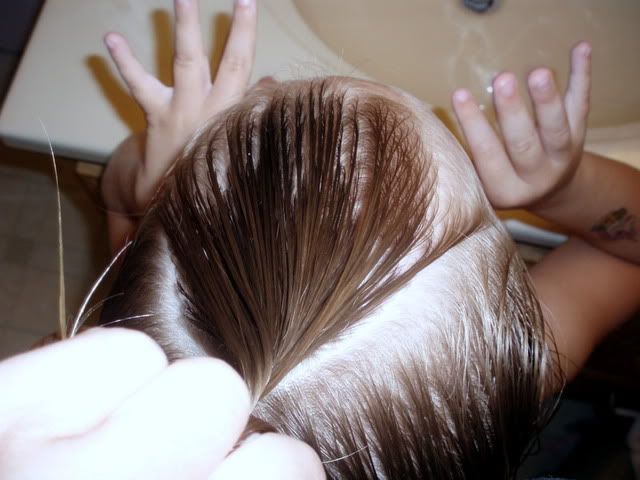
Comb the section of hair straight out from the head and then start twisting, either clockwise or counterclockwise, it’s up to you. My model thought it would help if she pointed
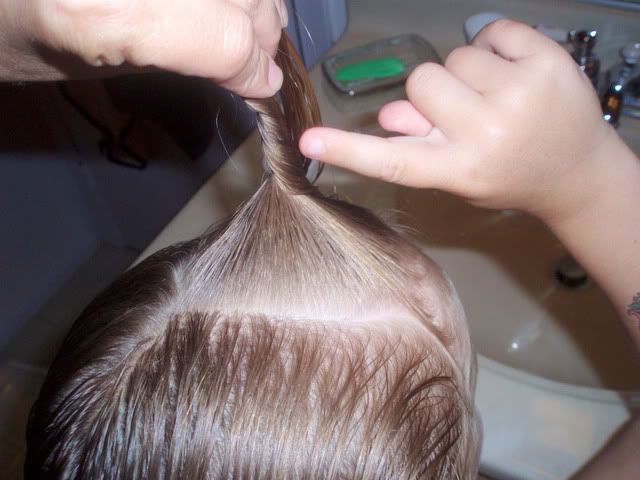
Continue twisting all the way to the ends
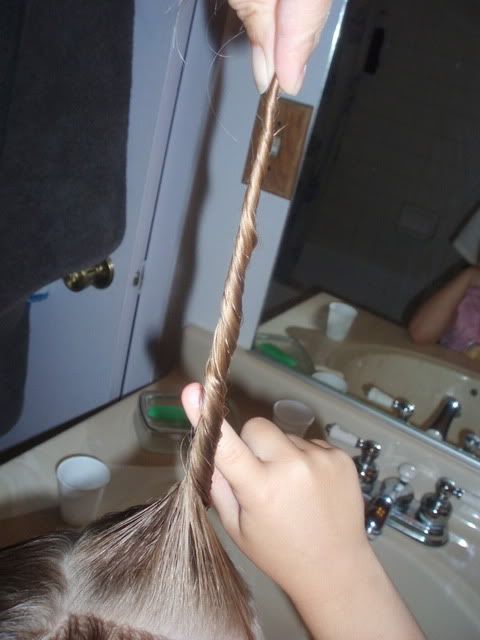
Place one hand just a few inches from the scalp and lower the hair toward the scalp, the hair should twist on itself as shown, you may need to direct the hair in place.
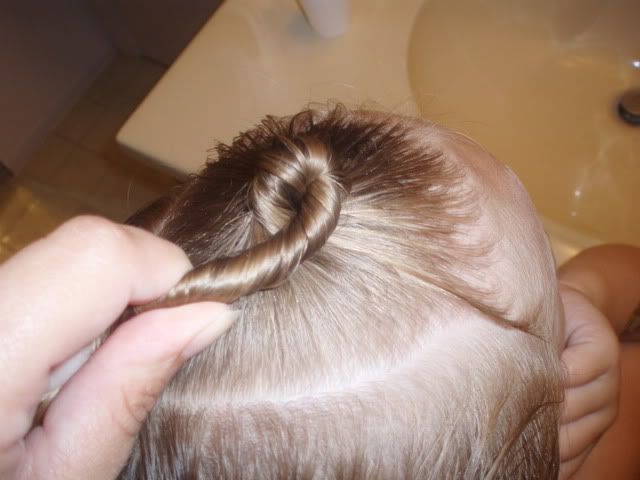
Wrap the tail around the base directing it underneath the previous coil of hair, closer to the scalp.
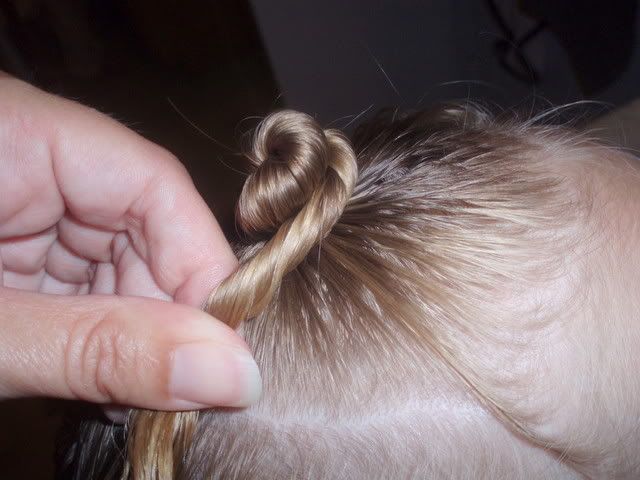
Continue wrapping the tail around the base making sure each coil goes underneath the previous one. Make sure to tuck the ends in at the bottom.

Place one ponytail holder over the knot and wrap around the base to hold the ends in.
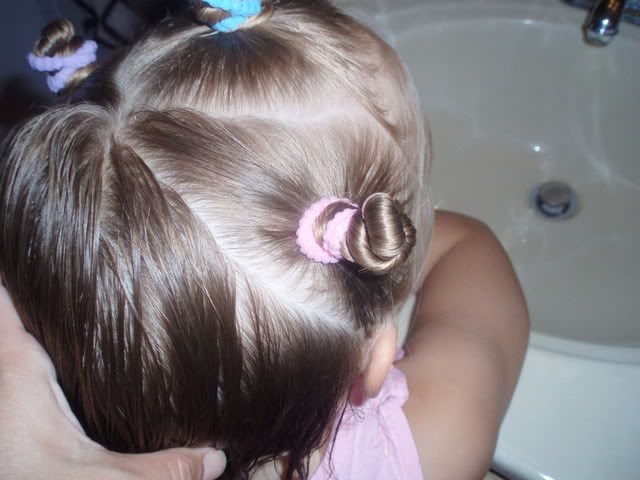
Make the next section from the tip of the triangle of the previous section to the ear. If the hair is thick, you may want to make this into two sections. My model has fine thin hair.
Repeat the steps for twisting the hair and securing the knot.
Make the same section on the other side of the head and repeat
Create your next section in the center behind the previous sections. I used diagonal partings resembling a V. Make and secure the hair knot.
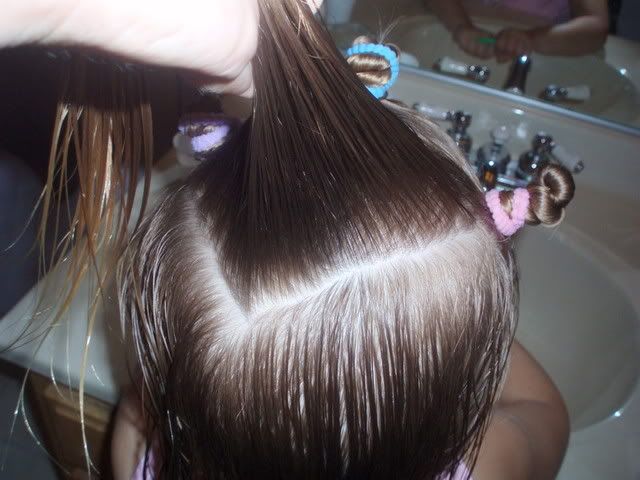
Your next section will be from the bottom/tip of the previous triangle to behind the ear on both sides.
After you’ve done both sides, make another V in the center and place your knot.
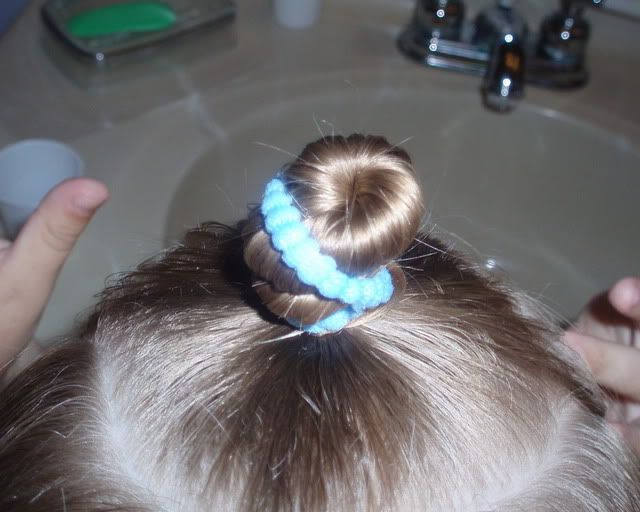
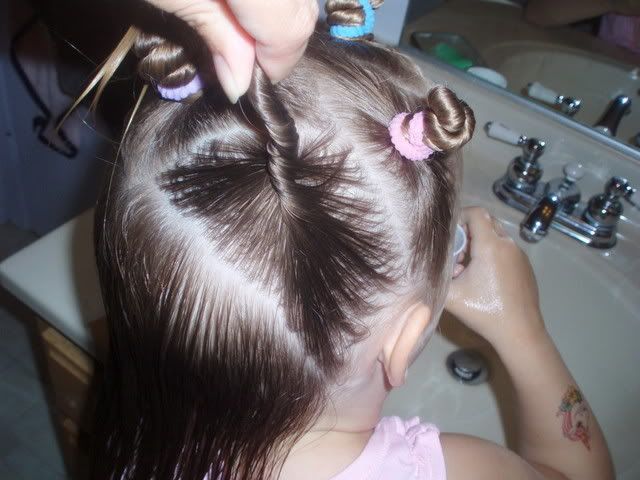
You will have 2 sections left

Make and secure your last knots
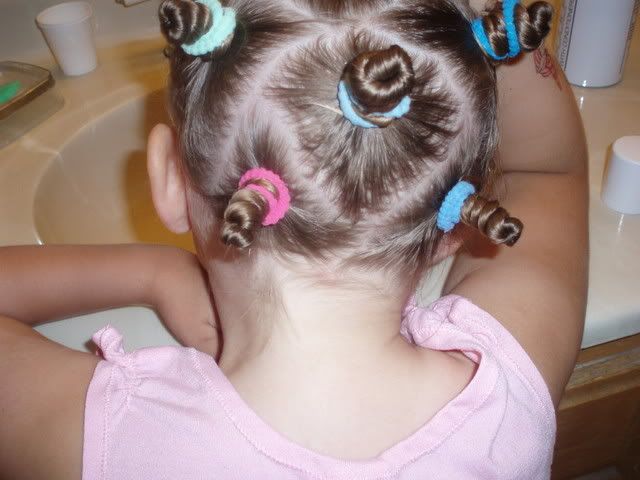
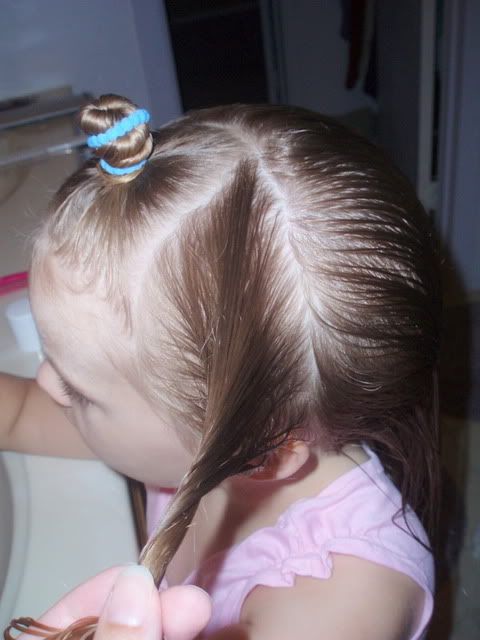
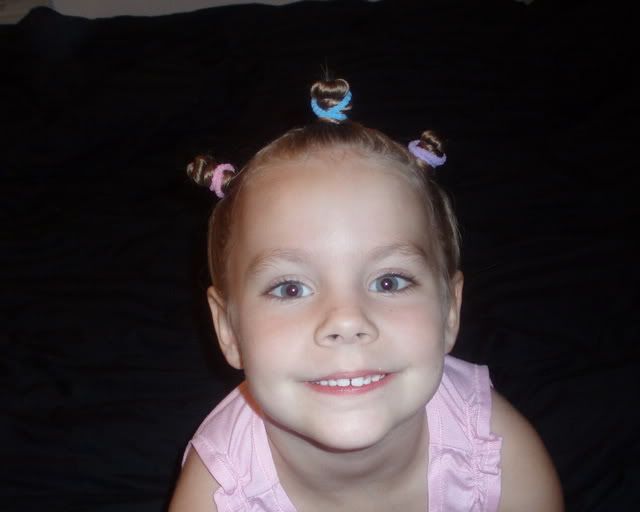
Here is what it will all look like
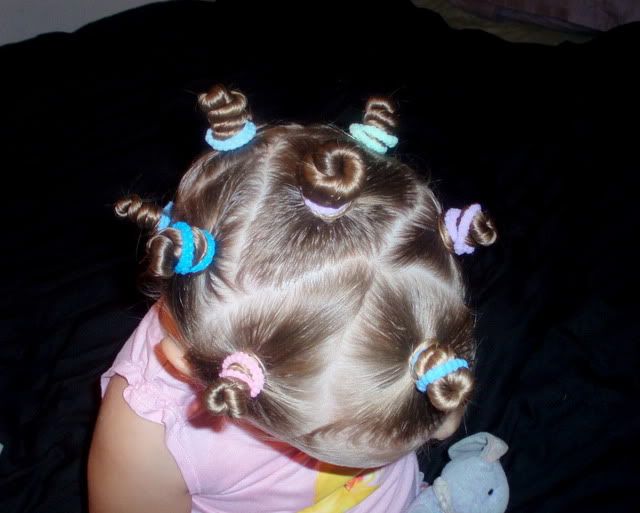
My model thinks she looks like a bug
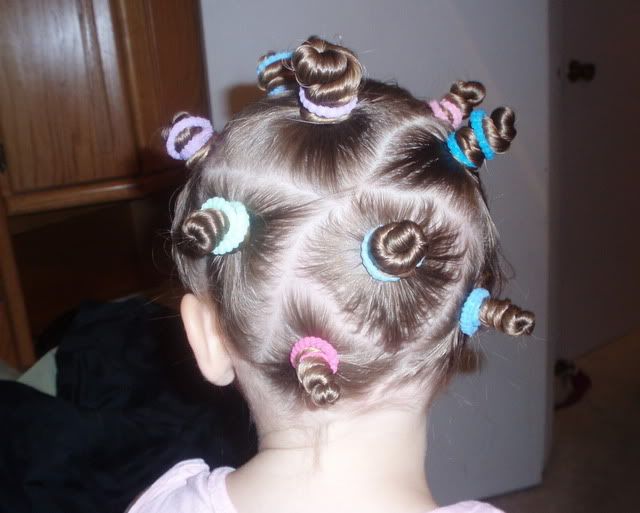
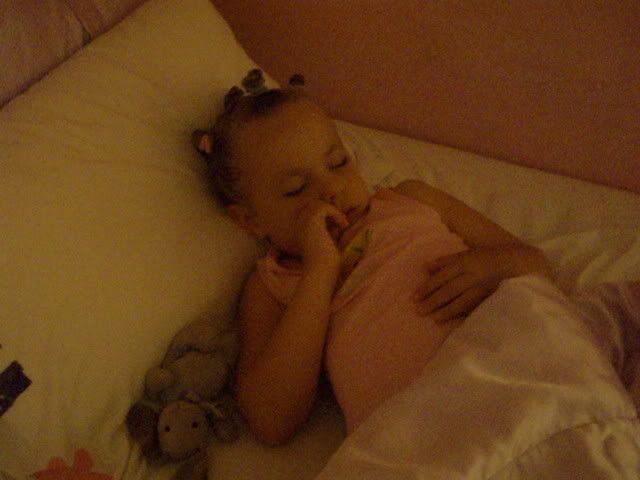
Tuck your model into bed and let the hair dry overnight
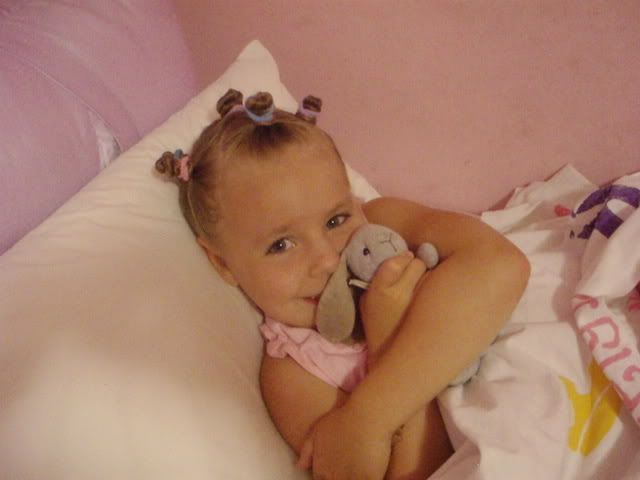

Check on her in a little while and make sure she is sleeping soundly, give her a little kiss…
In the morning remove the ponytail holders, feeding them breakfast at the same time can help with the attention span of young models!
Using your fingers, comb though the hair to undo the knots.
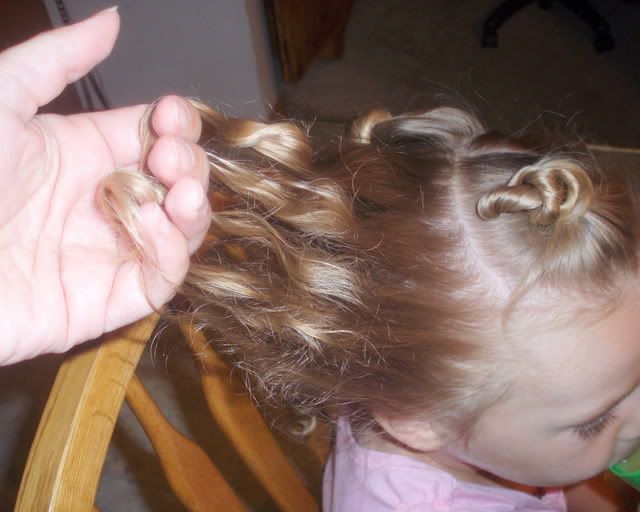
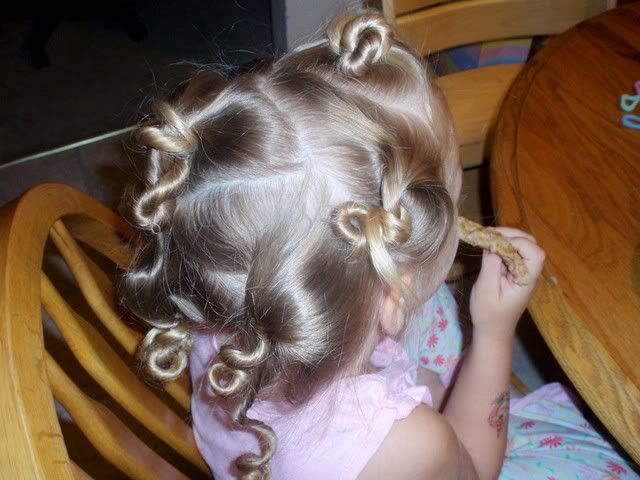
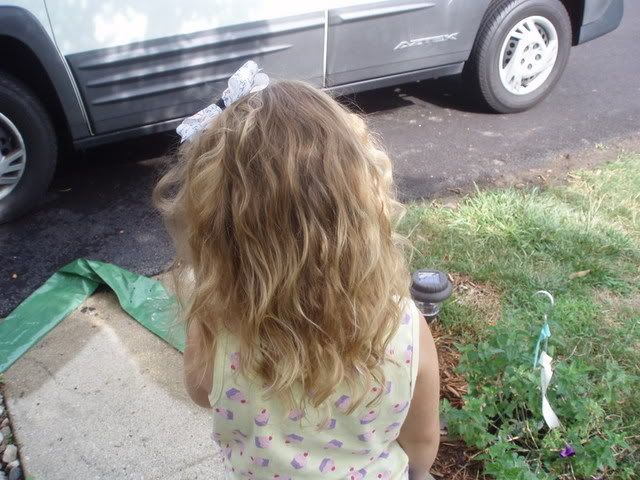
It will be very curly,
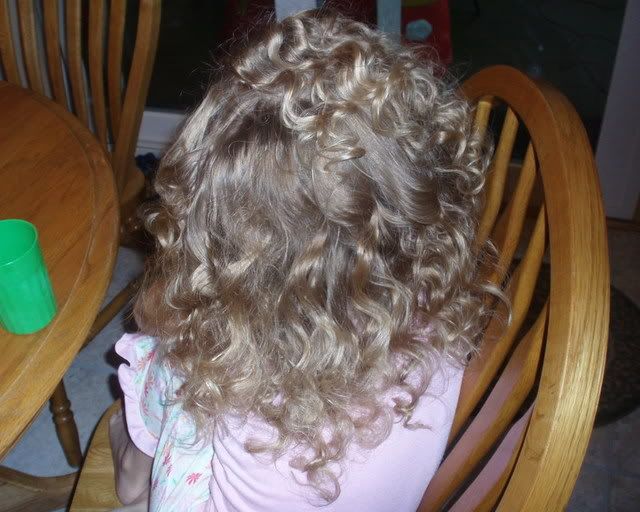
If you want to keep the curl tight for longer, style the hair and spray with a hairspray.
If you don’t spray it, the curl will loosen over time to more of a ringlet, which is what I like for my model
Again, you will need to experiment with how many and how big the sections will need to be for the texture and density of the hair you are using. Also keep in mind that the thicker the hair, the longer it will need to dry. An option is to set the hair after it is completely dry, just mist it lightly with water and liberally apply styling product. That should shorten the dry time. You can also help it along with a blow dryer (a diffuser attachment is very helpful!). If using heat to dry the hair, allow it to completely cool before releasing the knots.
Not everyone is lucky enough to have beautiful wavy or curly hair. But those of us with straight hair have an option to have curly or wavy hair for a day! This set turns out really cute on little girls for a dressy occasion and looks best adorned with your favorite Punky N Munky hair accessory!
Collect your supplies:
Hair product that is appropriate for your hair type
A comb
A bunch of knit ponytail holders
Place the hair product on clean towel dried hair and comb through to evenly distribute. If the hair is very thick, let the hair dry to just slightly damp before continuing.
Next we’re going to make sections in the hair. Triangles, diamonds, squares, and rectangles all work well. The smaller the sections, the tighter the curl will be. You will want to experiment for what works best for the hair you are working with. I will show you what works on my model.
Using the tip of the comb, make a triangular section from the corner of the eyebrows to the center top. Allowing your model to make silly faces in the mirror can help lighten the mood :)
Comb the section of hair straight out from the head and then start twisting, either clockwise or counterclockwise, it’s up to you. My model thought it would help if she pointed
Continue twisting all the way to the ends
Place one hand just a few inches from the scalp and lower the hair toward the scalp, the hair should twist on itself as shown, you may need to direct the hair in place.
Wrap the tail around the base directing it underneath the previous coil of hair, closer to the scalp.
Continue wrapping the tail around the base making sure each coil goes underneath the previous one. Make sure to tuck the ends in at the bottom.
Place one ponytail holder over the knot and wrap around the base to hold the ends in.
Make the next section from the tip of the triangle of the previous section to the ear. If the hair is thick, you may want to make this into two sections. My model has fine thin hair.
Repeat the steps for twisting the hair and securing the knot.
Make the same section on the other side of the head and repeat
Create your next section in the center behind the previous sections. I used diagonal partings resembling a V. Make and secure the hair knot.
Your next section will be from the bottom/tip of the previous triangle to behind the ear on both sides.
After you’ve done both sides, make another V in the center and place your knot.
You will have 2 sections left
Make and secure your last knots
Here is what it will all look like
My model thinks she looks like a bug
Tuck your model into bed and let the hair dry overnight
Check on her in a little while and make sure she is sleeping soundly, give her a little kiss…
In the morning remove the ponytail holders, feeding them breakfast at the same time can help with the attention span of young models!
Using your fingers, comb though the hair to undo the knots.
It will be very curly,
If you want to keep the curl tight for longer, style the hair and spray with a hairspray.
If you don’t spray it, the curl will loosen over time to more of a ringlet, which is what I like for my model
Again, you will need to experiment with how many and how big the sections will need to be for the texture and density of the hair you are using. Also keep in mind that the thicker the hair, the longer it will need to dry. An option is to set the hair after it is completely dry, just mist it lightly with water and liberally apply styling product. That should shorten the dry time. You can also help it along with a blow dryer (a diffuser attachment is very helpful!). If using heat to dry the hair, allow it to completely cool before releasing the knots.
Sunday, August 3, 2008
New Stuff!
Sorry I haven't posted in awhile! I want to thank everyone for the kind words about my Grandma and her passing. She is missed but we are comforted by the fact that she is in a wonderful place and we have lovely memories!
Anyway, I've been busy making new sculptures! Here are a few that I've photographed


Anyway, I've been busy making new sculptures! Here are a few that I've photographed


Subscribe to:
Posts (Atom)